Showing posts with label How-to. Show all posts

Tuesday, 15 November 2016

How to Enable Two step verification in WhatsApp

Two step verification in WhatsApp
Whatsapp is the social media app which is used by the most of the smartphone users in their day to day life. So it is very important for company to add security features for the user. The latest security features presented by the Facebook is the two step verification. Two-step verification is an optional feature that adds more security to your account. When you have two-step verification in your Whatsapp, any attempt to verify your phone number on Whats App must be accompanied by the six-digit passcode that you created using this feature.

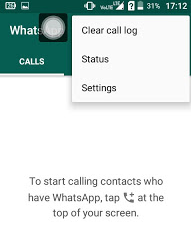
Step1: Open Whatsapp in your smartphone.


Step2: Click on three dot icon present on the top of screen.


 Step3: Click on Settings option that will pop up on the screen.


 Step4: Click on account option present on the screen.

Step5: Click on two steps verification.


Step6: Click on ENABLE option present on the screen.


Steps7: Now enter your six digit password and remember it, it will help you to secure your account.


After that user can optionally add their email addressThis email address will allow Whats App to send you a link via email to disable two-step verification in case you ever forget your six-digit passcode, and also to help safeguard your account. 

Friday, 1 April 2016

How to Create a Facebook Page for a Business

In order to create a branding for your product, you needs to have a Facebook business page. Facebook business page can help your reach your users. Following are the steps for creating business page for Facebook.


Step 1. Visit www.facebook.com with your browser


Step 2. Click on create page option which is present on the bottom of the sign in page of the Facebook.


If your are logged in your account from home page go to create page option on the left side of the window


Step 3. A window will appear, choose which type of business page you want to start


Step 4. Click on business option, a window will appear


Step 5. Fill up the form and then click on get started
Step 6. Fill up the form what your page is about and give a description


Step 7. Choose the profile picture of your choice


Click on next option

 Step 8. Add it to favorites or skip it


Step 9. Last page is a preferred page option you will choose or skip it
Then a page will be created


How to add a note on facebook

Posting a note on your Facebook account is one way to distribute information to all your friends, or a selected group of friends,or to everyone in the public. A note may include description, photo. It is a simple feature to use and can be  a beneficial tool for those who have information to distribute a lot of people all at once
 Step1.Visit www.facebook.com with your browser or app. 

How to add a note on facebook

 Step 2. Enter your email and password and log in to your account

How to add a note on facebook

Step 3. Brose your profile page. Look for the section entitled "Applications". This section is present on the left side of your profile.If you cannot see all the icons click on "more" link. And then click on notes section.


How to add a note on facebook

Step 4.  Click on add notes.

How to add a note on facebook

Step 5.  Choose the “Write a New Note” button at the top of the page if you wish to post a note to all of your friends. A new screen will pop up asking you to enter a title and the body of your note

Step 6.Tag people you mention in your note after you are finished by entering names in the “Tag People in this Note” box that is located on the top right of the pop-up screen.
Step 7.Upload an image to the note by clicking the “Choose File” button to browse for images to upload
Step 8.Choose who can see the note that you post by picking a user group from the “Who can see this?” option. 
Choose the “Publish” button to post your creation

How to hide your number on facebook

 If you are looking for ways using which you can hide your contact number on Facebook., i will tell you the way for it. In order to do that you needs to be go through following steps.


Step 1. Visit www.facebook.com with your browser or app.


Step 2. Fill up username and password and click on home page to arrive at homepage.
Step 3. Click on gear icon in the right corner and then click on setting option


Step 4. A new page will appear. Click on privacy option present on left side of the page.


Step 5. Click on edit option present on who can look up on phone number


Also read. How to add a note on facebook
 Step 6. Chose friends option only your friends are able to see your number


Step 7. But if you want no one can see your number then click on update info option.


Step 8. Click on contact and basic option

Step 9. Fill your mobile number and click on custom option


Step 10. A window will appear click on only me option

 
Click on save changes  and this hide your phone number

How to create a facebook account

1. Visit www.facebook.com


2. You will see sign up form there fill out your name,email or phone number password and date of birth and then click on create an account


3. If you do not see sign up form then click on create new account, a form will appear.


 4.Once you sign up you need to confirm your mail or phone number.


Also Read:


5. You will get either a text message or a email to confirm your mail address.
6. Confirm your account and then log in for Facebook. A new account will be created.


Tuesday, 29 April 2014

Step by Step tutorial for downloading your Facebook data (with snapshot)

Steps for downloading your Facebook data are as follow

Step 1. Login to your Facebook Account, then click on little arrow in the top right and select Setting.


Step 2. Now you will be landed on General account setting Page, at the bottom of this page you will find "Download a copy of your Facebook Data". Click on that Link for downloading your Facebook data.


Step 3. Clicking on that link will take you to Download your Archive Page. click on Start My Archive.


Step 4. Allow permission to Download your data and then Facebook give you a prompt with the following message.


Step 5. Click Okey. When Facebook complete your archive, you will get an email from Facebook with a link containing all your Facebook data. Download that data by clicking on Link.....Enjoy.

Saturday, 26 April 2014

How to Permanently Delete a Facebook Account

If you deactivate your account, your Timeline disappears from the Facebook service immediately. People on Facebook won't be able to search for you, though some info, like messages you sent, may still be visible to others.Facebook also save your Timeline information (ex: friends, photos, interests) in case you want to come back.

If you don't think you'll use Facebook again, you can request to have your account permanently deleted. Please keep in mind that you won't be able to reactivate your account or retrieve anything you've added. Before you do this, you may want to download a copy of your info from Facebook. Now if you'd like your account permanently deleted with no option for recovery than follow the following steps:

Step 1: Save all of your Data before deleting your account:

Before deleting your account you may like to save your pics, messages and contact information. You will not have any access when you delete your Facebook account. Facebook allow you to download a copy of all of your Facebook data. For this you can read "how to download your Facebook account data".

Step 2: Clear Your Facebook History

Facebook keeps a record of everything you search for on its Web site.Each time you look for a friend, business, or personality on Facebook, it gets saved to your search history.If you want to limit some of the information Facebook is keeping about you, or just tidy up the list, it's just a few clicks away. For this you can read "How to Delete you Facebook Search History".

Step 3. Visit the Delete account page

now you are ready for deleting your Facebook account. Firstly Login to your & follow the following steps
     1. After login to your Facebook account click on this Link.


     2. Now click on "Delete My Account" Button. It will ask you with a prompt with Permanent Delete Account, Click Okey to move forward.


3. Now it will redirect you to page where you need to enter your Facebook password and fill one captcha.


4. Now after entering detail it will take you to page as shown below. Actually it take 14 days to delete your account, within those days you can also recover your account by entering your credential and canceling the request.