Saturday 29 December 2012

How to detect Unusual Activity on Gmail

Hello friends. Do you think or suspect your Gmail account has been hacked or somebody else is using your account.? Do you suspect you Gmail account is under attack? Is your email account secured enough  that it can't be hacked. Do you want to make your email account 100% hack proof? If yes then this article is for you.So start reading it...

Sometime our email account has been hacked and we are not aware of that .Someone else i.e hacker is using your account and might be misusing it. But since we are nor aware of that and we still think that our account and it's privacy is safe but some third person is using it and accessing your private information and detail. Now how can you detect that your account is under attack or how to find unauthorized activity in your email activity? Here are some tips:

Sign of Unauthorized activity in your email account:

1. Your new email are marked as Read even if you haven't read them.
2. Your email are moved to Trash or even permanently deleted without your notice.
3. Your email are being forwarded to third party email address.
4. Your secondary email address has been changed.
5. Your phone information has been changed.

If you come across any of the above activity on your email account then it is clear information that your account is hacked.

There are some additional feature that Gmail provides it's user for security and safety of your account. Gmail provides an additional security feature to protect your email account through by means of IP address logging i.e Gmail record your ip address every time you loggin to your Gmail account. so if third party get accessed to your email then his/her ip address has been also recorded.

Also Read:


 The steps for checking activity in your email accounts are:
  • Scroll down to the bottom of your email account and you'll find "Last account activity".
  • Click on the detail under "Last account activity".
  • Now new window has been opened that shows the previous 10 activity detail i.e Access Type (Mobile , Browser, POP3 etc), Location (IP address) and Date-Time.
Steps to stop unauthorized activity on your email activity:

1. Verify your mobile phone, so that if your account is somehow got hacked then it will be easier to recover your email password.
2. If you suspect that your email account has been already been hacked  then these are recommended that you can perform.
  •  Change your Password.
  • Change your Security question.
  • Remove any third party email address (if any) to which your account is set to forward email.
  • Make sure that you can access the email account of your secondary email address.
  • Also change the secondary email Password and Security question.
This will help you to stop all the illegal activity in your account. But there are several people who have asked me that their account has been hacked or they forgot the password. Please wait for my next post in which i will explain how to recover hacked email account or locked account.

'I hope you all like my post, For any query or suggestion please comment below....... '


How to Delete Automatically Spam Message in Gmail

Everyone gets a significant number of spam email which are saved in different folder named as spam in Gmail account. Those email are useless and they unnecessarily reduce the free space given by Google. Again if you Share your email address publicly or Subscribe to any Newsletter, The probability of spamming your email account increases.

This is why you should clear your spam box to regain the space. Despite the fact that the spam reduce the email space of Gmail account, people ignore the task of deleting them regularly.deleting the spam regularly being exhausting so this problem can be solved if they can delete spam automatically. The best way to keep clean your email account is automatically delete the spam box so that you can never run out of space.

In order to delete spam automatically from your Gmail account:

1. Sign in your Gmail account with your email and password.
2. Click on the gear icon   in the upper right and then select Settings.


3. Click on the Filter tab and look out for "Create a new Filter".


4. Click on Create a new filter and search out for the box contain "include the words".


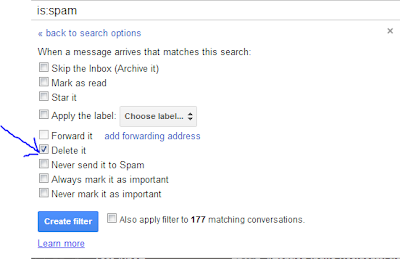
5. In the "include the words" box  enter" is:spam" (without inverted commas).


5. Now click on Create filter with this search.
6. As you click on that you get the warning,simply ignore the warning and move to next step.


7. Now check the box Delete it .You can also apply this filter on the existing spam in your account by selecting the appropriate options.


8. Finally click on create filter.

Once you configure and create the filter properly, all the incoming mail which are flagged as spam will deleted automatically. You can now make sure this by visiting your Spam folder.

Though i have explained this method for Gmail but you can apply the same method to other email provider using the similar procedure.Now you  don't need to care about spam because they will be deleted automatically.

Hope you like this post.If you have any query or doubt, comment below:


How to Find gmail Account Creation Date

How to find Gmail account creation date. Well this question has immense value when it comes to Gmail Password Recovery. Why?? Because during initiating a password reset using Gmail contact form, you have to enter Gmail creation date, otherwise you are not allowed to reset your password. So i have mentioned two ways by which you can know the Gmail account creation date.

Method 1: Gmail welcome mail 

All Gmail account receive "Gmail welcome mail" after they create Gmail account. So this Gmail welcome mail has the same date as your gmail account creation date.So noting this mail will serve the purpose. Go to Gmail Inbox to and hit the Oldest button to get the last message. this message will be from Gmail Team. Note down the Date and you are done!!

Note : This case may fail if you had deleted your Welcome mail ,So you are unable to get the email creation date. If you are one of those proceed to Method 2.

Also read:


Method 2: Using POP

Well this method will work for account created after 2007.

1. Sign in to your Gmail account.
2. Click on the gear icon  in the upper right , then select Settings.
3. Now click on Forwarding and POP/IMAP Tab.
4. In POP Download section look out for " Status: POP is enabled for all mail that has arrived since 3/31/11."


5 This above date (which is 3/31/11 in MM/DD/YY format) is your account creation date

Hence you are Done!! hope you like this Post. For any query or for any suggestion on this post your can comment below.


How to export Gmail contact

Gmail makes it easy to maintain an address book. Everybody with whom you contact is automatically added to your contact's list. Off course additional contact's are also added by the you as well.

But what if the you wants to move or copy your contact's list to correspondent - to other Gmail account, to other email like Yahoo, Hotmail, To Apple address book, to Desktop or other Desktop email program such as Outlook etc.

You can quickly export your Gmail contact into an CSV file format .Here is how:

1. Sign in to your Gmail Account.
2. Click Gmail at the top left corner of your Gmail page, then Choose Contacts.


3. From the more Action drop Down menu, Select Export.


4. Select the format in which you would like to export your contact's information. Please note some of these format can may lose some contact information.

  • To transfer contacts between Google account, use the Google CSV format.this is the recommended way to backup your Google Contact information.
  • To transfer contact to Outlook,Yahoo,Hotmail or various other Apps, use Outlook CSV format.
  • To transfer contact's to Apple address book, use the vCard format.
5. Click Export.
6. Choose Save to disk and click OK.
7.Select the location you want to save your file and click OK.

Depending on the requirement of the program  in which you are exporting your contacts from Gmail, you can easily edit the file to fit your need.

How to Delete Your Gmail Account Permanently


Out of all email service provider, Gmail is the one that attracts us more because of it's so many features.you can easily create account and attach multiple account to one. But if you wish to delete you Gmail account? For this also Gmail provide a facility where you can delete your Gmail account permanently

Deleting your Google account will affect all product associated with that (i.eGmail Blogger,AdSense etc), and effect each product differently. Before deleting your Gmail account review the data associated with that account on the Google Dashboard. If you use Gmail with your account you'll no longer be able to access that  email.You'll also unable to reuse your Gmail username.

     To Permanently Delete your Google Account:


1. Sign in to the Gmail Account.
2. Click on your name or email address at the top of your page, and then select Account setting from drop down menu.


3. Click Close Account And Delete all info Associated with it at the bottom of Account setting to  Delete your account.


4. Confirm your account deletion by entering your Password. To do so, you will need to select two options:  "Yes i want to Delete my account" and "Yes i acknowledge that i am still responsible for any charges incurred due to any pending financial transaction " (You can safely select the second option if you haven't used any of the Google paid products such as Google AdWords and Google Checkout or if you have no pending financial transaction related to these product).


Restoring a Google Account:

If you accidentally delete your Google account you can attempt to restore it by going to Password Assistance page within a limited window of time after deletion. Select I don't know my password and click the link to verify your identity on the following page.

Also read:


How to add Your own Image as Gmail Background Picture

It’s finally possible – you can now set any image as your background in Gmail. Two new themes give you complete control over the image behind them, allowing you to use your own picture or pick your own from a wide selection.
Gmail launched in 2004. Longtime Google geeks doubtlessly remember where they were when they finally got an invite to the then-exclusive service. Offering a complete 1 GB of storage space to Hotmail’s 2 to 4 MB, Gmail was kind of a big deal. Fewer probably recall when Gmail added “themes” to its email service, which was in 2008. Well, now there are custom themes in Gmail.
Is it the most important interface change Google has ever made? Of course not. That was a silly question to ask. However, being able to customize Gmail themes with your own photos is, while not essential, a nice feature to have. If you love personalizing things, I recommend you check this out right now.

Also Read:


Using Custom Themes

To get started, open Gmail. Click the gear in the top-right corner, click “Themes” and scroll until you see this option:
background images gmail account
Pick “Light” or “Dark“; it doesn’t matter for now. When you do, you’ll be able to pick your picture:
background images gmail
You have a few options – Featured photos, your photos from Picasa, photos from your phone (assuming you use the Google+ app), uploading photos or adding a URL. Find a picture you like.
Uploading is easy because of a drag-and-drop interface:
background images gmail
Once you’ve picked your image, play with the settings to find out whether the “Light” or “Dark” theme works better for you.
There are a few caveats:
  • You cannot set Gmail to automatically rotate your own images, slideshow style. Hopefully this is coming.
  • You cannot adjust the image to fit better on Gmail’s end; you’ll need to do that before, if you think that’s necessary.
  • Vertical images will probably look weird with this, unless you primarily use a vertical monitor.
  • Some people may not have this feature yet. Just wait: everyone will have it eventually.

A Few Examples

The first thing I did, naturally, was try this with one of my favorite wallpapers. I wasn’t disappointed with how it looked:
background images gmail
Then I tried it with a photo my wife Kathy took during a recent vacation. I like how it turned out too:
background images gmail account
That structure is in Hovenweep National Monument and dates back to 1500, well before Europeans got to America. The people who built these structures left them behind, and no one knows precisely why. Seeing this image reminds me that technology is temporary, and occasionally something entire societies leave behind.
That’s why customization is nice – you can add your own ideas and memories to something that is otherwise impersonal.
Do you need ideas? This video shows off a variety of different photos behind Gmail’s interface. Check it out:

Conclusion:

What’s there to say? It’s Gmail, with your favorite pictures. I’m sure some people will use .
Please share links to any particularly awesome wallpapers or photos you create or find in the comments below. I can’t be the only one looking for something awesome to try out.


How To Undo Send Email in Gmail

Many of the time you send Email to your Friends or your Boss but after sending you feel that there is some spell mistakes happens or you shouldn't have to send that email to some particular recipient.Hitting the "send" button in a hurry in that case can be worse nightmare.In that time you might think if there is any way i could "undo" the send email.

  Did you know you can Undo send e-mail in Gmail? It's lesser known feature, but Google just made it even better then it was before.
When it was launched, you were given a 5 second during which you can hit "Undo".Now that's upto 30 second.So, you can Undo the action by enabling the "Undo Send" lab.

      To enable the lab: "Undo send" are:

     1. Click on the gear icon  in the upper right , then select setting
     2. Click the Labs tab.
     3. Find the "Undo Send" lab and then select the Enable radio button.
     4.Click Save Changes at the bottom of the page.

Select the amount of time you have to Undo sending a message by clicking the gear icon and then finding the "Undo send:" section in the General Setting.


Also Read:


Saturday 22 December 2012

Recover Accidentally Deleted Files From Any OS With PhotoRec [Windows, Mac, & Linux]

recover deleted filesSometime back when i switched from Windows to Linux OS for learning some of the interesting features about Linux OS.One day i accidentally deleted some of my important documents.After that i had searched a lot and finally got a good way to recover files in Linux OS also.The software using which i had recovered my files is Photorec.

Previously i had write about the recovery tools like Recuva and Pendora Recovery. Recuva works fine with Windows only but for OS like linux, Photorec is the good choice to recover your files. Photorec is not only a Photo recovery tool as suspected from it's name but this tool recover all other types of files like Audio,Video,.exe, etc.

PhotoRec comes bundled with another, more advanced recovery tool called TestDisk. For now we’ll be focusing on PhotoRec which will suit most data recovery tasks. TestDisk is on another level of data recovery and capable of recovering whole partitions which is overkill when all you want to do is recover accidentally deleted digital camera snaps.

I’ve used PhotoRec a few times in the past, mostly to test what it’s capable of. For those of you looking for “proof” of the software’s effectiveness then I’ll give you a little insight into my recovery options.

recover deleted files

Recovering With PhotoRec:

First download PhotoRec and extract it to anywhere except the drive you want to recover deleted files from. Don’t forget, the more data you write to a volume you’d like to recover from, the more data you are potentially destroying. Execute PhotoRec and you should see a window appear in your default console app (Terminal for OS X and Ubuntu users, Command Prompt on Windows).

how to recover deleted files
PhotoRec requires root (admin) access to your PC, and OS X users will see the screen I’ve included above. At this prompt on a Mac system simply hit enter to restart, input your password and you’re good to go. On Windows, you will need to run PhotoRec from an administrator account and on Linux you will need to do this from the command line using the sudo command, e.g. “sudo testdisk-6.13/photorec-static” followed by your administrator password.
how to recover deleted files

Once you’ve got PhotoRec running it’s a case of simply following the on-screen commands. First choose the device you would like to recover deleted files from, in my case it was the 2GB drive listed in the screenshot above.

restore deleted files

Next you’re prompted to choose a partition, along with a few options along the bottom of the screen. The Options screen has preferences for keeping corrupted files and enabling additional controls, while File Opt allows you to omit certain file types from the recovery process
restore deleted files

If you’re simply out to see what you can recover, I’d recommend leaving everything as default and hitting Search. The next screen asks whether you’re using an EXT2/EXT3 file system, or something else. For NTFS, FAT, HFS+ and other drive types choose Other.
restore deleted files
Next up you’ll be prompted whether to scan the whole volume or just unallocated space. On large drives a whole partition scan will take a long time, though on USB drives and memory cards it’s probably worth waiting a couple of hours if it means regaining lost data

The final prompt asks where you would like to recover the data to. The only really important thing to remember here is not to recover to the volume you are recovering from! I made a folder on my desktop and let PhotoRec go to work. Hit C to start the process, then let PhotoRec do its thing.


The final prompt asks where you would like to recover the data to. The only really important thing to remember here is not to recover to the volume you are recovering from! I made a folder on my desktop and let PhotoRec go to work. Hit C to start the process, then let PhotoRec do its thing. 

I was lucky this time, I managed to recover more than 600 photos, despite erasing and writing to the volume twice. PhotoRec is an invaluable free tool to have at your disposal, especially on Mac OS X where so many companies charge for file recovery sof.

recover deleted files

Have you had any close calls with data loss? Have you used PhotoRec or TestDisk in the past? Share your “oops!” moments in the comments, below. 


Friday 21 December 2012

How to Change your Facebook Background

Bored with the same BLUE&WHITE Facebook theme This is a very cool trick to change theme of your facebook profile and make it cool ... just look at my facebook page  below ... is'nt it looking cool..! huuha now i'll explain you how to do it in this post ....

BEFORE INSTALLING THEME


AFTER INSTALLING THEME


Requirement: The basic requirement for this to work is to have Mozilla Firefox 3.5 or higher
Steps To change facebook theme: The following steps should be carried out to successfully change Facebook theme.

  •    Follow the basic steps and install the addon.

  •     Restart Firefox after successfully installing the stylish addon.
  •     Login to your Facebook Account and click on the small 'S' button located at left bottom       corner in your Firefox status bar
  •     Click on "Find Styles for this Site" to open a new tab with free themes to use for Facebook.

  •     Click on any theme and a preview will be shown.

  •     If everything is fine in the previewed theme, click on "Install with Stylish" button at the top right corner of the page
Install with stylish
.

  •     A dialog box will open.
  •     Click on Install in the dialog box. 

Note:This trick also works for all major websites like Google,YouTube etc.
Now your facebook will look different depends upon which theme you selected. 
like I selected this One...cool naa..! enjoy..


Facebook allows Drag N’ Drop Photo Uploads For Posts

Photos are becoming an integral part of Facebook. So is the way we use them. Facebook is apparently keen on making the photo experience smoother and the roll-out of a drag and drop feature could be a start. Facebook is introducing the drag and drop functionality to the publisher box from where we post our status updates and shares. Normally it takes about six clicks to upload a single photo and publish it on Facebook.
The new feature cuts it short to a single drag and drop, and also allows you to upload multiple photos in one go. Usually, publishing multiple photos require one to create a photo album and then share it across with the network. Now you can expect to publish a post with multiple clicks with one drag and drop. This new ‘expected-soon’ update receives a thumbs-up for user friendliness. The feature is being gradually rolled out and is not apparent yet in all profiles.


There feature pop out on my Facebook page when i open my account to update the new look of my blog.Now you can also change your cover pic by just Drag-and-Drop the pic you want to updates.So today Social Networking giant allows Drag-and drop facility to it's user.
 

How to Password Protect USB in windows 7

It is very important to keep your USB drive or external hard drive safe if you have lots of valuable data in it. To protect your data from others you should have to set up a password for the flash drive. Windows 7 lets you protect or lock your hard disk and removal drives by its Bit-locker feature.
The bit - locker is an encrypting tool, built-in with your Windows 7 OS. It can encrypt your whole drive and lock it by your given password. To access into the encrypted drive, one should provide the correct password.
To run the BitLocker you may need the administrator privilege. Learn how to enable administrator account in Windows 7.
This tutorial will describe the steps how to use the BitLocker and setting up a password to USB free. By this procedure you can also protect your external hard disk or internal hard disk drives.
Protect USB drive by BitLocker:

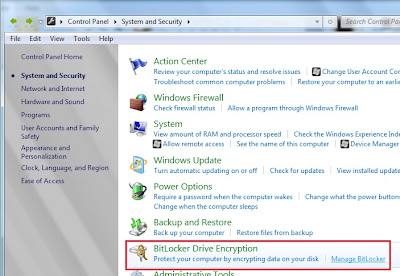
To find out the Windows Bit-Locker easily, type "bit locker" in the start menu search box. Or, you can go to Control Panel > System and Security > BitLocker Drive Encryption.

                              Control Panel > System and Security > BitLocker Drive Encryption

Click on the "Manage BitLocker" and the window will show you to "turn on BitLocker" to the specific drive. Now click on "turn on BitLocker" beside your selected drive. Then the BitLocker will start and will ask you how you want to unlock the drive.


Select "Use a password to unlock the drive" and type your password. Then select a method to recover your password/key and press Next to start the encryption.


It would take a few minutes, depending on the size and the format of your drive. You are done! From now any user of Windows 7/Vista/XP must provide the password to open your USB drive.  

Saturday 1 December 2012

Gmail allows to send more then 10 GB's data with Google Drive

 Sending and receiving large files is now possible on Gmail. Google has announced on its official blog that it is integrating its cloud storage service Google Drive into Gmail.

Gmail users can now send files of up to 10 GB using Google Drive, the Web giant's cloud-storage service That's 400 times bigger than files that can be shared in a regular e-mail, according to Google's Gmail team.And because the files are stored in the cloud, all recipients will always have the latest version of the file.


Google Drive was launched in April and enables users to insert files from Drive directly into an email without leaving their Gmail accounts.
''Gmail will also double-check that your recipients all have access to any files you're sending. This works like Gmail's forgotten attachment detector: whenever you send a file from Drive that isn't shared with everyone, you'll be prompted with the option to change the file's sharing settings without leaving your email.
Since you’re essentially sharing a link to the file in the cloud rather than the file itself, you can continue to update it, with those updates showing up for your recipient as well. As with other cloud services such as Dropbox and Box, you can collaborate on the shared document with the recipient directly in Google Drive, keeping a single copy rather than passing drafts back and forth.

Once it’s attached, Gmail will ensure that your recipient has permission to view the file in your Drive account -– or will prompt you to grant that permission –- and then sends the message.


The feature works not only for files you attach to the message, but also for links to items stored in Google Drive you might paste into a message.

Also Read:


Since you’re essentially sharing a link to the file in the cloud rather than the file itself, you can continue to update it, with those updates showing up for your recipient as well. As with other cloud services such as Dropbox and Box, you can collaborate on the shared document with the recipient directly in Google Drive, keeping a single copy rather than passing drafts back and forth.