Sunday 9 February 2014

How to change Windows 7 Logon screen

Hey Guy's don't you get bored of same Log on screen? If you love customization like me and would like to add add some of your own image in place of boring log on screen then you are at the right place. Today i will tell you how to change Log on screen image.
Following are the steps to change your logon screen image.

Step 1. Click on "Start button", Go to "Run" prompt (Windows key + R).


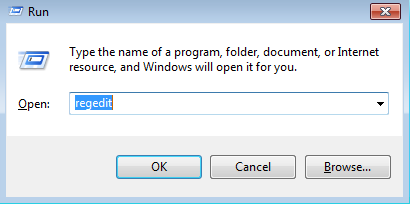
Step 2. Type "regedit" and click Enter.


Step 3. New window will open as shown below.


Step 4. Navigate to Following path

HKEY_LOCAL_MACHINE\SOFTWARE\Microsoft\Windows\CurrentVersion\Authentication\LogonUI\Background

Also Read:


Step 4. Now change value of "OEMBackground" 0 to 1. you can do so by right clicking on "OEMBackground". Once value changed to 1 Click OK.


step 5. Now open the path 

C:\Windows\System32\oobe


Step 6. Create a new folder name "info". Also create a new folder  "Backgrounds" in inside info folder.


step 7. Now copy paste your own image in that folder and rename the image to “backgroundDefault.jpg” and refresh the PC.


Step 7. Finally press windows key + L now you can see your own Logon screen.


Also Read:

How to UnHide a Disk Drive in "My Computer" (Step by Step tutorial)

Sometime for privacy purpose if you need to hide some Drive of your computer then you are at the right place.Today i will tell you how to hide Drive in My computer. Following are the steps to hide Drive in My Computer.

Step 1. Click on "Start button", Go to "Run" prompt (Windows key + R).


Step 2. Type "gtedit.msc" and click Enter.


Step 3. Local group policy window will open.


Step 4. Follow the path

User configuration > Administrative Template > Windows Component > Windows Explorer


Also Read:

Select "Windows Explorer" root folder and see the list in right side of window.


Note. You can also switch to standard tab to get the better view.

Step 5.From the list select "Hide these specified Drive in my computer" from the list.


Step 6.  Double Click "Hide these specified Drive in my computer" and then a new window will open.


 Step 7. In this window select the "Enable" option at the top. Click on Apply and then click OK.


Step 8. Now Go to My Computer and you will see that the Hidden Drive is visible now.


Step 9. As you can see D drive is back now. Enjoy Folks.

How to Hide a Disk Drive in "My Computer" (Step by Step tutorial)

Sometime for privacy purpose if you need to hide some Drive of your computer then you are at the right place.Today i will tell you how to hide Drive in My computer. Following are the steps to hide Drive in My Computer.

Step 1. Click on "Start button", Go to "Run" prompt (Windows key + R).


Step 2. Type "gtedit.msc" and click Enter.


Step 3. Local group policy window will open.


Step 4. Follow the path

User configuration > Administrative Template > Windows Component > Windows Explorer


Also Read:

Select "Windows Explorer" root folder and see the list in right side of window.


Note. You can also switch to standard tab to get the better view.

Step 5.From the list select "Hide these specified Drive in my computer" from the list.


Step 6.  Double Click "Hide these specified Drive in my computer" and then a new window will open.


 Step 7. In this window select the "Enable" option at the top and then Select the Drive which you want to hide. Once you had select the drive, Click on Apply and then click OK.


Step 8. Now Go to My Computer and you will see that the specified Drive is hidden now.


Step 9. As you can see D drive is not there. Enjoy Folks.

To have the hidden Drive back in My Computer click here.

Also Read: