Friday, 29 November 2013

How To Reveal Hidden Passwords (Asterisks) In Web Browsers

This is the very first trick that i had learn a long back. By using this you can view any saved Password in any Web-browser.

Following are the steps to View Password behind asterisk :

Step 1. Open the website where password is saved by the user. Here I’ll take the case of  Facebook.


STEP 2. Right click on password field.


Step 3. Then Click on inspect element.


Step 4. When you Click on inspect element then screen will be like this as shown below.


Step 5. Now look at the code window that look like this as shown below.


Step 6. Now change type="Password" to type="text" as shown below.


Step 7. Done, as you change password to text,  asterisk or dots in Password field will changed to Plain text.


 Don't try to Enter my Password, I had changed it after the demo.For any queries , Leave comments below.

Also Read:

Use a Master Password to protect stored logins and passwords in Firefox

Firefox can save usernames and passwords that you use to access online services, such as banking and email websites. If you share a computer with anyone, it is recommended that you use a master password because otherwise anyone can see you Password in Plain text. To know how you can see Saved Password In Firefox Click Here.


Note: After you've set a master password, it needs to be entered the first time you remember a new password or remove passwords and each time you show your passwords, for each Firefox session

Defining a master password :
By default, Firefox does not use master passwords to protect stored credentials. To define a master password:
  1. At the top of the Firefox window, click on the Firefox button and then select Options
  2. Click the Security panel.
  3. Check mark Use a master password.
  1. The Change Master Password dialog appears.
  2. Enter your master password. The Password quality meter will indicate the difficulty of guessing the password. To create a quality password, your master password should include the following:
    • At least one capital letter.
    • One or more digits.
    • At least one non-alphanumeric character, such as the following: @ # $ % ^ & * ( ).
    • Also, remember to make your password something that is easy for you to remember, but difficult for others to guess to ensure that you, and only you, will be able to retrieve this secure information. For more information on choosing passwords, see Create secure passwords to keep your identity safe.
  3. Enter the password a second time to confirm that you can enter it consistently.

  1. To set the master password, click OK.
  2. Click OK to close the Options window

How to view saved password in Firefox

This trick can be used to improve your Password security or Stealing your friends Passwords.Following are the steps for Viewing save Password in Firefox.

Step 1. Open Firefox web browser.


Step 2. Then click on Firefox > options > options


Step 3. Then Pop-up Window will appear. In that go to Security tab and then click to show Saved Password as shown below.


Step 4. Now click on website whose password you want to see. 


Step 5. Now Click to Show Password as see your Facebook Password In clear Text.


Hence you can see anyone can see your Secret Password which you had saved in Firefox.

How-to Watch 18+ videos on youTube without signing in

Following are the steps for watching 18+ videos on YouTube without signing in :

Step 1. First get the url of video you want to watch as shown below:

For Example :
http://www.youtube.com/watch?v=T2yDJeDHzXE


Step 2. Then copy the video id
For above link Video Id is "T2yDJeDHzXE"

Step 3. Now paste the video id in the link given below:
http://www.youtube.com/v/###?fs=1&

Step 4. Now Replace ### with the id you copied in the step 2.

Step4. Now your url will become as shown below:

https://youtube.googleapis.com/v/T2yDJeDHzXE?fs=1


Now you can enjoy any Video without giving your identity.....Enjoy.

Also Read:

How to find serial key of any software using simple google trick

Following are the steps to find serial key of any software using simple Google tricks:

Step 1. Go to Google.


Step 2. Then Type "Software name 94FBR".
Note : Replace Software name with the name of the software whose serial key you want to find out.
Eg To find Serial key of  IDM you’ll Type IDM 94FBR.


Step 2. Now press Enter and visit Top links, you will get the serial key of that Software.

For any queries or software key if you can’t find out, Leave comments below.


Also Read:

How to Create Non-Detectable or Non-Delete-able folder in Windows

Following are the steps for creating non-detectable & Non-Delete-able Folder :

Step 1. Go to Start and Click on Run.


Step 2. Type cmd & hit Enter key.


Step 3. You can’t create Non-detectable & Non-Delete-able Folder in root directory (I mean where Windows is installed).

Step 4. Type D: or E: and hit Enter (Because mostly Windows is installed in C directory).


Step 5. Type md con\ and hit Enter.


Step 6. You can also use other words like ayx, lpt1, lpt2, lpt3 …. Lpt9 in place of con in above step.

Step 7. Now open that directory, you can see the Folder with name con there.


Step 8. Try to Delete that Folder or Rename that Folder, windows will give you the error message.


How to Delete con Folder

It is not possible to delete that folder manually but you can delete this folder by another trick:

Step 1. Open Command Prompt.


Step 2. Type D: and hit Enter (where D is the directory name where your folder is created.)


Step 3. Type rd con\ and hit Enter Key.


Step 4. Open that directory to check but the Folder is deleted for sure. If it doesn't check out the steps again you might  had made some mistake.

Also Read:

How to convert a Webpage into PDF file.


Following are the steps to convert Webpage into PDF File:

Step 1. Open Google Crome browser on your Windows /MAC PC.


Step 2. Now go to Webpage that you want to convert into PDF document.


Step 3. Now press Ctrl+P on Windows and Command+P on MAC to open the Print Dialog.


Step 4. Now change the Destination as “Save as Pdf” .


Step 5. Now click on  Save as PDF Button as shown below.


Step 6. Step 5. Now click on  Save  Button and choose the destination folder.


The Webpage will be instantly downloaded into your System.

Thursday, 21 November 2013

How to Setup Windows 7 or windows 8 from USB Drive

The USB flash drive has replaced the floppy disk drive as the best storage medium for transferring files,

There are reasons why you would prefer USB device over a DVD disc, and bootable software is definitely one of them. Not only is it faster to copy data such as setup files from a USB drive, but during usage the access times are also significantly faster. Therefore, installing something like Windows 7 will work that much faster from a USB drive than from a DVD.


Also Read:


"Need to install Windows 7 on a computer with no DVD drive? Do you want to create a backup installer in case your install disc becomes damaged? Follow these guide to get the Windows install files onto a bootable USB flash drive".

Before you install Windows 7 first you need to check out for minimum hardware requirements for installing Windows 7. For this you can read Minimum Requirement for installing Windows 7 Guide

Steps for installing Windows 7 or Windows 8 from USB Drive are as follow :

Step 1. Create bootable USB Drive.
  • Download PowerISO v4.8 or newer from here.
Note :You can download PowerISO trial version from above link & you can also purchase Full version from here. But for installing Windows you can proceed with trial version.
  • Insert the USB Drive you intend to boot from.
  • Choose the menu "Tool >Create Bootable USB Drive". The "Create Bootable USB Drive" dialog will popup. If you are using Windows Vista/7/8 Operating System then you need to confirm the UAC dialog to confirm.


  • In Create Bootable USB Drive dialog Click "...." button to open the iso file of Windows 7/8.
  • Select the correct USB Drive from the Destination USB Drive list if multiple USB Device are connected to the computer.
  • Choose the proper writing method "USB-HDD" is recommended.

  • Click start button to start Creating Windows 7 or Windows 8 from USB Drive.
If no errors occurred in the above process, you should now be all set to setup Windows 7 / 8 from USB drive!


Also Read:

Step 2: Configuring the BIOS:

You should now reboot and go into the BIOS configuration to boot from USB. Instructions for doing so differ from system to system, but generally entail the following:
  1. Reboot the system.
  2. While booting (before Windows starts loading), get into the BIOS configuration screen by hitting something like F1, F2, Delete or Escape. Hotkey instructions are generally provided on the screen.
  3. Go to the section that contains your boot devices.
  4. With your USB drive plugged in, the USB drive should be listed. If it isn’t, your system might not support booting from USB. Assuming that it is supported (as is the case with virtually all modern hardware), promote your USB drive to the primary boot device.
  5. Exit from the BIOS configuration, saving all changes.
If you’re completely new to BIOS configuration, BIOS for Beginners . Be aware though, that you can seriously screw up your system by providing incorrect settings!


Also Read:

Step 3: Booting and setup windows 7 / Windows 8 from USB drive:

Assuming that you properly configured your BIOS and your USB drive supports booting,  Windows 7 / 8 setup should now load. Depending on the speed of your USB drive, this may take a while.

If it isn’t working, then double-check the following before making a scene:
  • Is your BIOS properly configured for booting from the USB device? (Is the USB device listed and does it have top priority?)
  • Have you correctly prepared the USB drive in step one? (Restart the procedure.)
  • Does your USB drive properly support being booted from? (Try another one!)


Wednesday, 20 November 2013

How to install Backtrack from USB Drive

Booting an Operating System every time using optical drive is not an easy because DVD are not easy to keep.Mostly you got screeches on your DVD and it does not work anymore.So, Now you can boot operating system from USB Drive also.

Following are the steps for installing operating system USB Drive.

Step 1. Download Backtrack ISO from Here.


Step 2. Insert your USB Drive in your system Minimum USB Drive capacity should be at least 2Gb.

Also Read:

Step 3. Download Ubetbootin from http://unetbootin.sourceforge.net/ and install in in your system


Step 4. Start Ubetbootin and select disk image (Use the backtrack final iso).


Step 5. Select your USB Drive and click OK for creating a bootable USB Drive.

Step 6. Now enter into BIOS and set Boot priority to USB Drive.

Step 7. Now insert USB Drive into system and Power on system, now it'll start booting.

Note : If you want to know steps to install Backtrack in detail click here.

Step 7. Login in the Backtrack with default Username="root" and Password ="toor".

Also Read:


How to Rename recycle bin

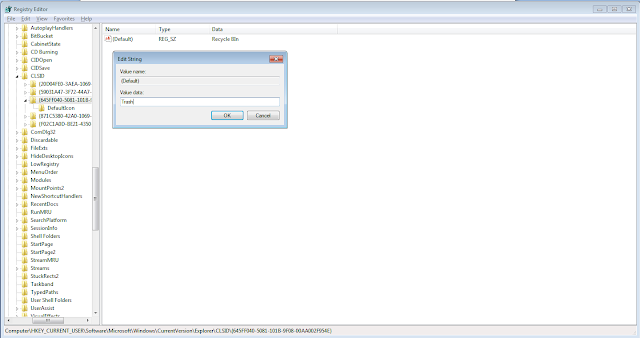
Have you ever try to change the name of recycle Bin? Normally you Microsoft don’t allow you to do but you can do it by the below Method. You can try any of the name like Trash, DustBin, Use Me etc whatever you like.


Also Read:


Here are the steps how you can rename the Recycle Bin.

Step 1.  Go to Start > Run.

Step 2. Enter Regedit and click Enter to open registry editor.


Step 3. Navigate to the Following:

HKEY_CURRENT_USER → SOFTWARE → MICROSOFT → WINDOWS → CURRENT VERSION → EXPLORER → CLSID → {645FF040-5081-101B-9F08-00AA002F954E}


Step 4. Double click on default on the right panel, small window Pop-up.


Step 5. Enter your desired name for recycle Bin into the empty Field called “value Data”.


Step 6. Click OK to save your Changes and click Refresh on Desktop to see the changes.


now you can see, name for your recycle Bin changed to Whatever you have enter.


Tuesday, 19 November 2013

How to Block Facebook On Windows

Do you like to Block Facebook on your computer? Did you want your employees not to have access to Facebook? Do you want to block Facebook on your child computer? If you do then you are at right place. After reading this post you will be able to block Facebook on Windows computer.

Although this is the easiest method to block facebook but this method only work if the person whose Facebook you are blocking is Noob and don’t know about how internet works.If you want to block Facebook on IT company employees or computer guy’s then check out below method for blocking Facebook.


Also Read:

So let’s start with the steps for Blocking Facebook.

Step 1.  Go to start > All Programes > Accessories and find Notepad under it.


Step 2.  Right click on Notepad and click Run as administrator.


Step 3.  Now open Host file by clicking on File > Open and locate the following address.

             C:\Windows\System32\drivers\etc

Step 4. Now find  ” #   127.0.0.1       localhost” and under this add

127.0.0.1       www.facebook.com
127.0.0.1       blog.facebook.com
127.0.0.1       m.facebook.com
127.0.0.1       apps.facebook.com
127.0.0.1       login.facebook.com

Step 5. Click Save and Exit the host file and you are done.


Step 6. Now try to open Facebook in any of the browser if it open then you have done something wrong and check out the steps again.

Note : You can also bloack any of the website by using this method. For example if you need to block Twitter then you need to enter  “127.0.0.1       https://twitter.com” in the host file